How to Organize Your Japan Trip Photos: The Ultimate Guide

Japan does something to your camera roll that almost no other destination does.
It isn’t just that the country is photogenic, though it is. It’s the density. In one afternoon in Kyoto you can walk through a bamboo grove, a vermilion torii gate, a centuries-old temple garden, a konbini that somehow looks like a film set, and a ramen counter with eight stools. You photograph all of it. Then you do the same thing the next day in Osaka, and the next in Tokyo, and by the time you land back home you’re holding somewhere between 1,500 and 3,000 photos, nearly all of them good enough that deleting them feels like a small betrayal.
So they sit there. Three weeks becomes three months. The Fushimi Inari shots are mixed in with a screenshot of a train transfer and a blurry photo of a vending machine menu.
This guide shows you how to organize Japan trip photos without giving up a whole weekend. It’s a method, not a gadget list: get your timestamps right, sort by place, cut the near-duplicates, keep the shots that actually tell the story, and finish with something you can share. It works whether you took 400 photos or 4,000, and whether you use a phone, a mirrorless camera, or both.
Want the destination-neutral version? See our complete guide to organizing travel photos or the shorter what to do with 800 photos after your trip.
Quick Answer
The best way to organize Japan trip photos is to work in five passes: (1) gather everything from every device into one place, (2) fix any wrong timestamps, (3) group photos by city or day, (4) cut near-duplicates and misfires, then (5) pick a shortlist of your best shots and turn it into an album, post, or story. Do it in that order, because each step makes the next one easier. If you’d rather not hand-sort thousands of images, an AI photo selector such as Trippy Taless can build the shortlist for you to review, but the method below works with any tool, including the folders already on your computer.
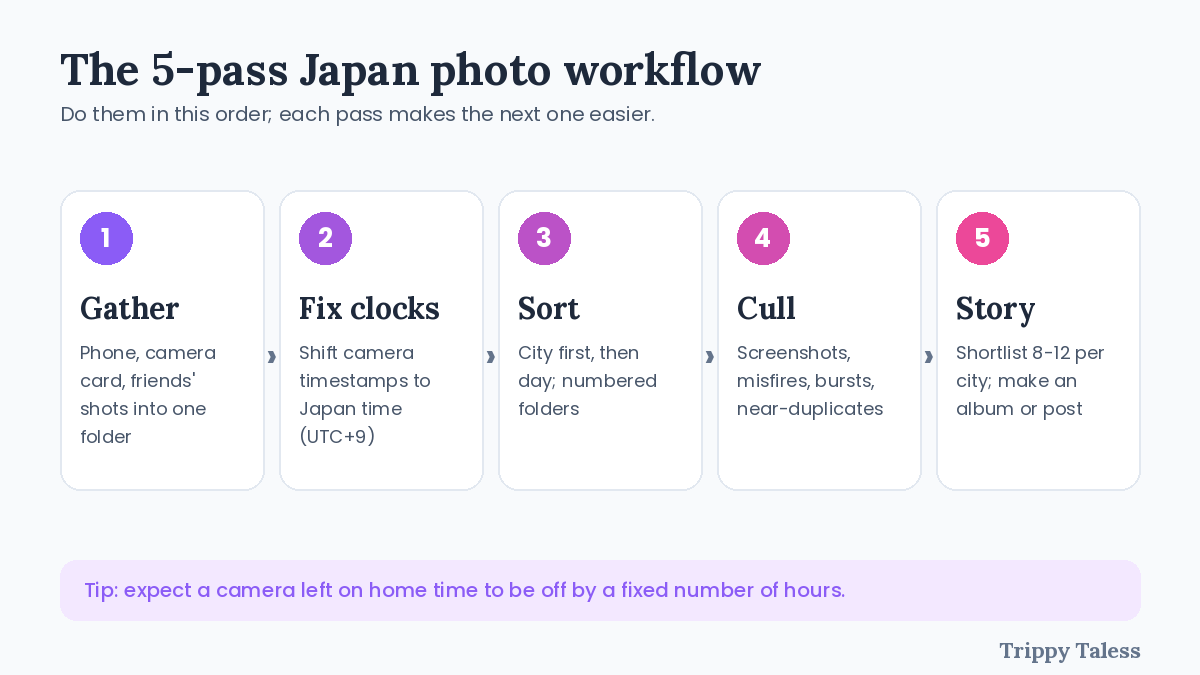
Table of Contents
- Why Japan Photos Are Harder to Sort Than Most
- Step 1: Gather Every Photo Into One Place
- Step 2: Fix the Timestamps Before Anything Else
- Step 3: Sort by City, Then by Day
- Step 4: Cull the Near-Duplicates
- Step 5: Pick the Photos That Tell the Story
- A Sample Folder Structure for a Two-Week Japan Trip
- Japan-Specific Photo Tips Worth Knowing
- Where AI Helps (and Where It Doesn’t)
- FAQ
- Key Points
Why Japan Photos Are Harder to Sort Than Most
Part of the challenge is volume. Japan has been drawing record numbers of visitors: the country welcomed an estimated 42.7 million international visitors in 2025, according to figures reported by Travel Market News (as of October 2026), and most of those people left with a camera roll full of the same extraordinary things.
But volume isn’t the only issue. Japan trips tend to have three features that make photo libraries messy:
You cover a lot of ground. The classic Tokyo, Kyoto, Osaka route, perhaps with a day trip to Nara or Hakone, means five or six distinct locations in a couple of weeks. Photos from a Shinkansen window, a temple, a street market, and a capsule hotel all land in the same chronological stream.
You photograph things that look similar. Torii gates, lantern-lit alleys, shrine ablution fountains, plates of sushi. After a week, even you can’t tell which of the six near-identical gate photos was the Kyoto one.
You shoot with more than one device. A phone for quick snaps, a camera for the “real” photos, maybe a travel companion’s phone too. Each has its own folder structure, its own naming scheme, and quite possibly its own idea of what time it is. That last one matters more than you’d think.
Step 1: Gather Every Photo Into One Place
To organize Japan trip photos, you first need a single home for the raw material. A common mistake is organizing the phone photos first and discovering the camera card three weeks later.
Create one top-level folder, something like Japan 2026, and pull everything into it:
- Photos and videos from your phone (use a cable, AirDrop, or your cloud service’s download option)
- The SD card from your camera
- Photos your travel companions sent you
- Screenshots you took of tickets, maps, or menus (you’ll sort these out in Step 4, but don’t lose them)
Don’t rename or arrange anything yet; the first rule to organize Japan trip photos is that nothing gets left behind. The goal of this pass is simply that nothing is left behind. If you’re short on space, copy rather than move so the originals stay safe until you’ve finished.
Tip: if your photos are on your phone but you’d rather work on a laptop, a QR-code upload can save you the cable dance. Trippy Taless offers a phone-to-desktop upload session for exactly this, though any transfer method works.
Step 2: Fix the Timestamps Before Anything Else
This is the step most guides on how to organize Japan trip photos skip, and it’s the one that quietly ruins everything downstream.
Every photo carries a timestamp in its metadata (the EXIF data). Phones usually update this automatically when you land in a new time zone. Dedicated cameras usually don’t. If your camera was still set to your home time zone, every photo from it is off by a fixed number of hours.
Japan Standard Time is UTC+9 year-round; Japan doesn’t observe daylight saving time. So if you flew from, say, London in the summer (UTC+1) and never changed your camera’s clock, its photos are eight hours behind. Sunrise at Fushimi Inari becomes a photo “taken” at 9 p.m. the previous night, and when you sort by date, your camera shots and your phone shots will refuse to line up.
The good news, as PetaPixel and other photographers have pointed out, is that the error is consistent. When a clock is wrong by the same amount for every photo, one offset fixes the whole batch. Most photo managers and free EXIF tools let you shift timestamps by a fixed number of hours across a selection, and ExifTool can do it in one command if you’re comfortable with a terminal.
How to check: pick a photo from your phone and one from your camera that you know were taken within a minute of each other (a shared meal works). Compare their timestamps. The difference is your offset.
Do this now, before you organize Japan trip photos any further. Sorting by date before fixing timestamps means you’ll sort twice.
Step 3: Sort by City, Then by Day
Once the clocks agree, chronological order does most of the work when you organize Japan trip photos. Photos from Tokyo cluster together, then Kyoto, then Osaka, with the date as a natural divider.
There are two sensible ways to organize Japan trip photos by place:
By city first, then by day. Best for trips where you spend several days in each place. Your folders read 01 Tokyo, 02 Hakone, 03 Kyoto, 04 Osaka, and inside each you have day subfolders.
By day only. Best for fast-moving trips where you changed cities every day or two. Folders are simply Day 01 - Arrival, Day 02 - Asakusa, and so on.
For most two-week Japan trips, city-first works better, because that’s how you’ll describe the trip to friends: “In Kyoto we did X, then in Osaka we did Y.”
If you have location data on your photos, you can often let your tools sort by place automatically. Be aware that this depends on metadata being present and accurate. Photos from a camera without GPS, or phones with location tagging turned off, won’t have it, and neither Apple Photos nor Google Photos nor any other tool can invent it reliably. Spot-check the results.
Pro tip: name the folders with numbers (01, 02, 03) so they stay in trip order rather than alphabetical order. “Kyoto” before “Tokyo” alphabetically is the wrong story.
Step 4: Cull the Near-Duplicates
This is the emotionally difficult step of trying to organize Japan trip photos, and it’s where most people stall. You don’t need to delete anything permanently if you don’t want to. Move the rejects into a _Review Later folder inside each city. The point is to get them out of your line of sight.
What to cull first, in rough order of how easy it is to say goodbye:
- Utility screenshots. Train transfers, hotel confirmations, translated menus, map pins. Useful on the trip, rarely useful after. Keep any you need for expense or visa records in a separate folder.
- Accidental shots. Pocket photos, finger-over-lens, floor shots.
- Obvious blur and misfires. Anything out of focus or badly exposed.
- Burst sequences. If you took 14 frames of a deer in Nara bowing for a rice cracker, keep the best two.
- Near-duplicates. The same temple from the same angle, three times. Keep the sharpest, best-framed one.
A useful rule: if you can’t tell two photos apart at a glance, you don’t need both. Keep the one where the light is better and nobody is mid-blink.
Most people find they can cut a large share of the library in this pass, often a third or more in our experience, though it varies a lot by shooter.
Step 5: Pick the Photos That Tell the Story
Here’s the shift that makes it worth the effort to organize Japan trip photos at all, and separates a tidy library from something you actually look at again: stop asking “which photos are good?” and start asking “which photos tell what the trip felt like?”
A strong Japan story usually has a mix of three kinds of photo:
- Establishing shots. The wide, scenic images that say where you were. Shibuya Crossing, the Kinkaku-ji reflection, the view from a ryokan window.
- Detail shots. The small things that carry the atmosphere: a hand-written menu, a vending machine at 11 p.m., the way the wooden floor of a temple looks after rain.
- People and moments. You and your travel companions, mid-laugh, mid-bite, mid-confusion at a ticket machine. These are the ones you’ll care about most in ten years, and they’re often technically imperfect. Keep them anyway.
When you organize Japan trip photos for sharing, aim for a shortlist of roughly 8 to 12 photos per city for a shareable album or carousel, and perhaps 20 to 30 per city if you’re making a longer photo book. You’re not throwing away the rest; they stay in your folders. The shortlist is what you show.
Manual vs. assisted: you can do this pass yourself with star ratings in any photo app. Or you can let an AI photo selector take a first pass. Trippy Taless, for instance, scores photos on quality and aesthetics and returns a shortlist of the size you choose, which you then review and change. It’s a starting point, not a verdict, and you stay in control of what goes in.
A Sample Folder Structure for a Two-Week Japan Trip
Here’s what a finished system to organize Japan trip photos might look like. Copy it and adapt it to your route:
Japan 2026/
├── 00_Admin (tickets, confirmations, screenshots)
├── 01_Tokyo/
│   ├── Day 01 - Arrival & Shinjuku
│   ├── Day 02 - Asakusa & Ueno
│   └── Day 03 - Shibuya & Harajuku
├── 02_Hakone/
├── 03_Kyoto/
│   ├── Day 06 - Fushimi Inari
│   ├── Day 07 - Arashiyama
│   └── Day 08 - Gion & Higashiyama
├── 04_Nara/
├── 05_Osaka/
├── _Review Later/
└── _Best Of Japan 2026/   <- your final shortlist
The two folders worth the effort are 00_Admin (it keeps the screenshots from polluting your story) and _Best Of (it’s the thing you’ll actually open).
Japan-Specific Photo Tips Worth Knowing
A few things worth knowing as you shoot and organize Japan trip photos.
Check the rules before you post. Some places in Japan restrict photography, and it affects what ends up in your library and what’s appropriate to share. In Kyoto’s Gion district, a residents’ association has banned photography on private alleys off Hanamikoji Street, with a reported fine of ¥10,000, according to reports from Japan Today and AFAR. Rules like this can change, so check current local guidance before you visit.
Expect no photos inside many temple halls. In most cases, photography is not permitted inside the main hall of a Buddhist temple, though gardens and grounds are generally fine, as noted in guides such as JapanesePod101’s shrine and temple etiquette overview. Look for signs, and when in doubt, ask. If you’ve followed the rule, your library will be tidier for it.
Be thoughtful about who is in your frame. Photographing people, especially geisha and maiko, monks, or worshippers, without their consent is the kind of thing that has pushed some neighborhoods into restrictions. A candid shot of your friend in front of a lantern tells a better story than a stranger’s face, anyway.
Photograph the unglamorous bits too. Convenience-store breakfasts, platform signs, the six-line train map you stared at for ten minutes. Years later these are often the photos that bring the trip back most vividly. Sort them into your city folders; don’t delete them with the screenshots.
Take a “title card” photo at each stop. A quick shot of a station sign or a shop front at the start of a new place works as a visual bookmark. When you scroll your library later, it tells you “new chapter starts here.”
Where AI Helps (and Where It Doesn’t)
AI is genuinely useful at the part of this process that people dread: looking at 2,000 photos and narrowing them to a few dozen. It can weigh image quality and composition across a whole set far faster than any person can.
It’s less reliable at things that depend on context only you have. It doesn’t know that the slightly blurry photo of your grandmother laughing is the one that matters. It can’t fix a camera clock that was set to the wrong time zone, and it can’t conjure location data that was never recorded. And like any AI tool, it makes mistakes, which is why the review step is part of the design rather than an afterthought.
A sensible split when you organize Japan trip photos: let the tool narrow the field and handle the tedious comparison, then spend your own attention on the final choices.
If you want to try that route, Trippy Taless’s free plan includes 100 photo analyses a month, which is enough to run a first pass on a trip and see whether the shortlists suit you. Free exports carry a watermark; paid plans remove it (see the live pricing page for current details, since plans and prices change).
From the shortlist, the app lets you save the photos into a trip and build an editable carousel or post with layouts and an AI-drafted caption. It doesn’t publish for you; you export the images and post in Instagram or wherever you share.
FAQ
What’s the best way to organize Japan trip photos?
Gather every photo into one folder, fix any wrong timestamps, sort by city and then day, cull near-duplicates, and pick a shortlist of your best shots to turn into an album or post. Doing the steps in that order avoids redoing work.
Should I organize photos by date or by location?
For a multi-city trip like Japan, sort by city first and then by date within each city. That matches how you’ll remember and describe the trip. For a trip where you moved nearly every day, sorting by date alone is simpler.
Why are my camera photos and phone photos out of order?
Usually because the camera’s clock was never changed to Japan time. Phones typically update automatically; most cameras don’t. Compare two photos taken at the same moment to find the offset, then shift the camera photos’ timestamps by that amount.
How many Japan photos should I keep?
There’s no fixed number. Many people keep everything in an archive and curate a shortlist for sharing, roughly 8 to 12 photos per city for an album or carousel. Culling blurry shots, screenshots, and near-duplicates often removes a big chunk of a trip library.
Can AI organize Japan trip photos automatically?
AI can speed up the hardest part: choosing the best shots from a big set. It can’t fix wrong timestamps or add missing location data, and its picks should be reviewed. Trippy Taless, for example, returns an AI shortlist you can edit.
Is it okay to photograph temples and shrines in Japan?
Outdoor grounds and gardens are generally fine, but photography is usually not allowed inside main halls. Look for signs, avoid flash, and ask when unsure. Some areas, like private alleys in Kyoto’s Gion, have specific photography bans.
How should I back up my Japan photos?
Keep at least two copies, ideally one off-site or in cloud storage, before deleting anything from your phone or camera card. Finish culling before you free up space on the original devices.
Key Points
- To organize Japan trip photos, work in five passes: gather, fix timestamps, sort by city and day, cull, then choose a story shortlist.
- Fix camera timestamps first. Japan Standard Time is UTC+9 with no daylight saving, so a camera left on home time is off by a fixed number of hours.
- Sort by city, then day, using numbered folders so they stay in trip order.
- Cull screenshots, misfires, bursts, and near-duplicates; move rather than delete if you’re nervous.
- Aim for roughly 8 to 12 shortlisted photos per city for sharing; keep the rest archived.
- AI can narrow the field quickly, but it can’t fix bad metadata and should always be reviewed.
- Check current photography rules before you shoot, especially in places like Gion and inside temple halls.

Conclusion
A Japan trip is a lot to hold in one camera roll. But the work to organize Japan trip photos is smaller than it looks once you stop treating it as one giant job. Gather it, fix the clocks, sort by place, cut the clutter, and choose the photos that carry the feeling of the trip. An afternoon is usually enough.
And when you’re done, don’t leave the best of it in a folder. Turn the shortlist into something you can show: a carousel for Instagram, an album for your family, a recap for the friend who keeps asking how Kyoto was.
Try AI photo selection on your Japan photos with Trippy Taless — start with a small set, review the shortlist, and see what your trip looks like when it’s finally in order.
Facts about visitor numbers and photography rules are drawn from the sources linked above and were last checked in October 2026. Local rules and policies can change, so confirm before you travel.
Loved this story? Trippy Taless turns your own travel photos into a curated album like this — automatically.
Start Your Travel Story Free